How To Make Mother’s Day Cards
This post may contain affiliate links. Please see my Privacy Policy for full details.

Mother’s Day is just a few weeks away. If you’re looking for a simple and easy card to make for Mom (or Mum), you’re in the right spot.
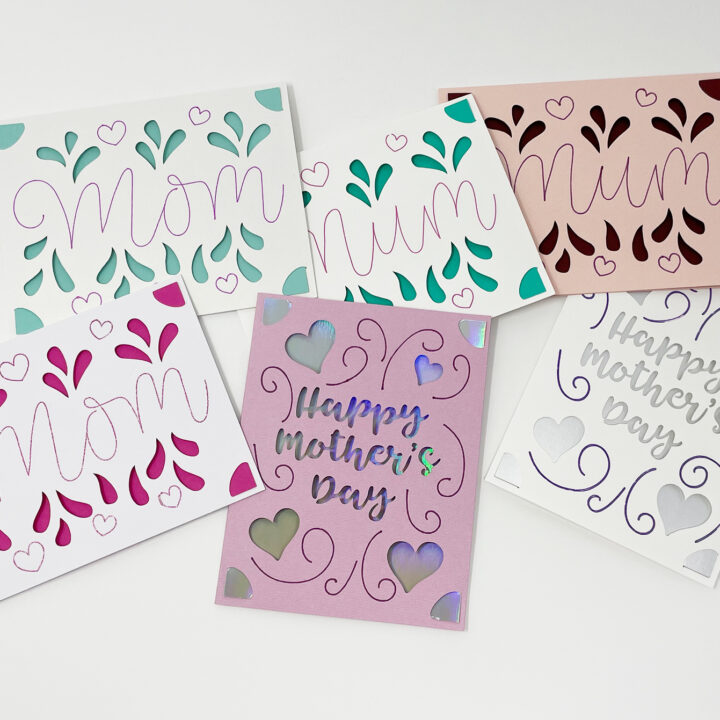
These three designs are simple yet pretty. All three can be made using either the Cricut Joy (with card inserts) or one of the regular size cutting machines such as Cricut EA2, Maker, or a Silhouette.

The pink and white Mom card on the left was cut on a Cricut Joy using the card inserts. the teal and white card on the left was cut from Recollections 65lb. cardstock with a Cricut Maker.
We don’t mind if you use these designs for personal or small business commercial use up to 200 items, but please do not re-sell or re-distribute the files. We ask that you direct your crafty friends here to download the files themselves. Also, we don’t allow our designs to be used in print on demand shops or on transfers that will be sold. Please refer to our TOU for full details.
Materials Needed For Mother’s Day Cards
Materials for the project will depend on your machine choice.
Cricut Joy users:
- Card Inserts – For these designs, the 4.25″ x 5.5″ insert cards are perfect.
- Joy Pens
- Card Mat
- Cricut Joy
Explore Family or Maker users:
- 65lb. cardstock The card and insert will use 2 pieces of 8.5″x11″ cardstock. For the envelope, a 12″x12″ piece will be needed.
- Art Glitter Glue – This is my favorite liquid adhesive glue (there’s no glitter in it).
- Scoring Stylus or Scoring Wheel – The wheel is only available for Maker users.
- Brayer
- Light grip mat (blue)
- Cricut Maker – or your favorite cutting machine
Design #136 – Mother’s Day Card Designs – The free cut files (available in my freebie vault—get the password at the bottom of this post).
Video Tutorial using Cricut Joy and Insert Cards
The below video will show step-by-step the simple process of using a Cricut Joy along with the Insert Cards. For those using a regular size Cricut, scroll down for written instructions.

How to Make Mother's Day Cards
Learn how to make a simple Mother's Day card with your Explore Air 2 or Cricut Maker using a FREE SVG Cut File.
Materials
Tools
Instructions
- Download and unzip the free cards from my Freebie Vault. Design number 136
- The regular SVG version should upload at 5.5" x 8.5" size. If it's imported at a different size, make sure it's now set to this size.
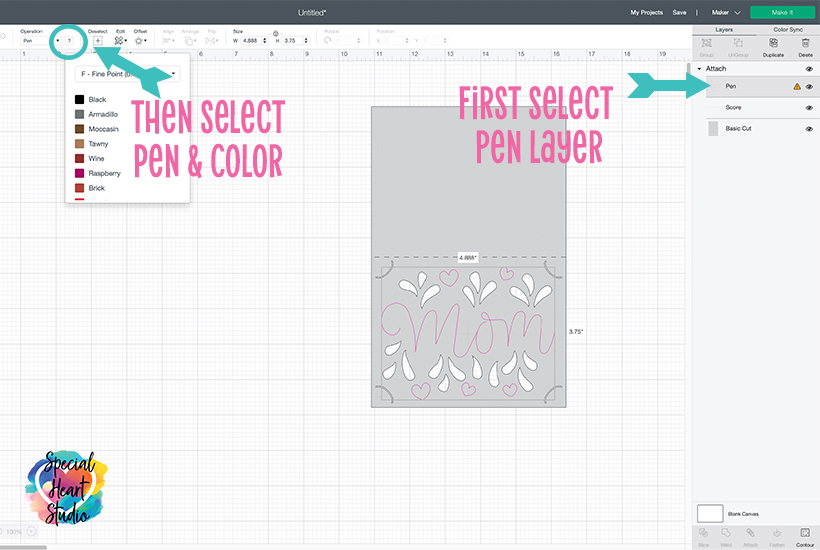
- Upon uploading, there will be a yellow warning triangle on the Pen layer. This is to warn that the machine doesn't know which pen to use. Select that layer and choose the pen and color for your card. Once the pen is selected, you're ready to "Make It".
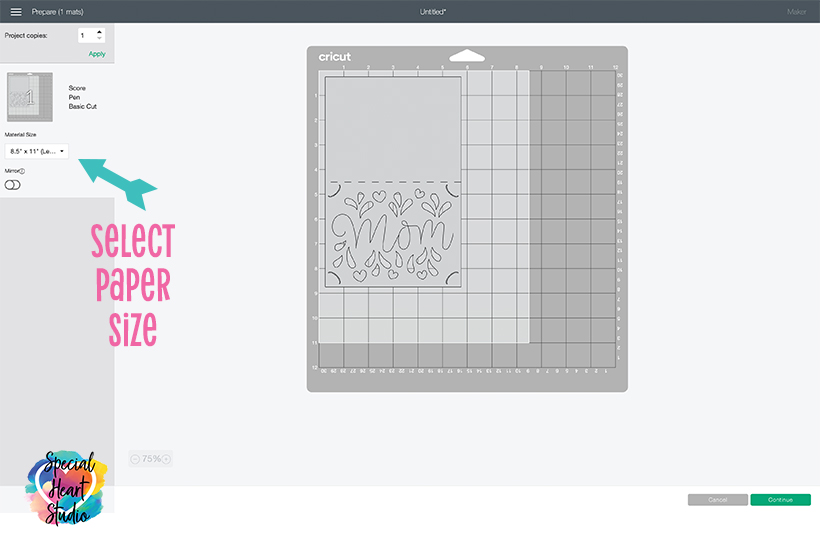
- On the Prepare Mat screen, select the paper size. Then click continue.
- Select the weight appropriate to your material.
- Load Tools - The Make screen will inform to load pen and for those using a Maker, the scoring wheel. If you do not have a scoring wheel, you may click the Edit Tools link for the Scoring Stylus option.
- For Explore users or Maker users without a scoring wheel, a stylus can also be used. Alternatively, the card could be hand folded and the scoreline completely removed from the main canvas screen.
- Use a brayer to ensure the paper is firmly adhered to the mat to reduce tears while cutting.
- Remove the paper from the mat by turning it face down on your work surface and gently bending the mat away from the paper.
- Once off that mat, simply fold the card in half along the scoreline and crease.
- Insert the card insert in the corners of the card.
- An envelope SVG is also included in the design, cut and score the envelope, then glue edges.
- The Photo below shows cards made with the Cricut Joy Insert Cards and regular cardstock.
Whichever method you choose, these cards are sure to please and are quick and easy to create. ❤️
Download My FREE Mother’s Day Card Cut Files By Subscribing Below To Get The Password To My Freebie Vault
DOWNLOAD the Mother’s Day Cards SVG/DXF/EPS – Design #136 by entering the password to my Freebie Vault. Click HERE to go to the freebie vault, my library of free downloads. To sign up for a password to my free designs, enter your name and email address below. ⬇️


 Whichever method you choose, these cards are sure to please and are quick and easy to create. ❤️
I don’t own an Cricut Joy – but I do own the Maker – do you know if Cricut makes the same package of Cards for the Maker as they have for the Cricut Joy?
Sadly, the insert cards are specific to the Joy. I sure wish they would. I did play around trying to use a Joy card on the 12×12 mat, but the challenge is getting the design lined up to cut correctly on the card as there’s little room for error.
I agree, they don’t sell them. However, the maker can cut your own out easily. You could prepare a bunch, then use as desired. I think Apple products give you the snap grid option that would help with lining everything up perfectly.
I made the Happy Mother’s Day cards on my Maker using regular cardstock. I cut a piece of foil cardstock for the insert, used 8.5×11 cardstock for the card and used 12×12 cardstock for the envelope.
I already have a password. Why do I have to re-subscribe every time?
Hi there. If you already have the password, you don’t have to subscribe each time. You can go to the freebie vault from the links on the blog post and just input the password. 😊
Thanks for making this so easy! Can you tell me what font you used?
The “Happy Mother’s Day” cut-out was created from this font. affl link https://fontbundles.net/geekmissy/2003-the-tingler-a-font-duo-with-stencil-style?ref=VTJ6Og
i can’t get my explorer to use the pen option for the swirls on the same mat it prompts me to use a second mat for the swirls what am i doing wrong
There seems to be a glitch with some DS users on this one. You’ll want change each of the swirl lines into draw, then “attach” all of them to the card.