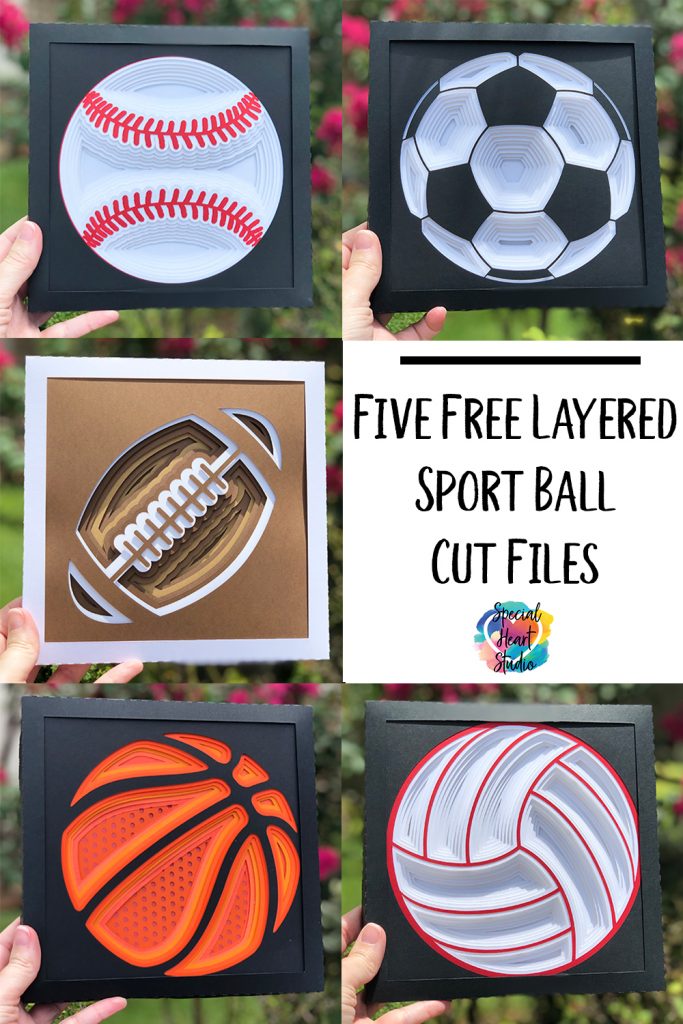
FIVE FREE SPORTS BALL LAYERED SVG CUT FILES
This post may contain affiliate links. Please see my Privacy Policy for full details.
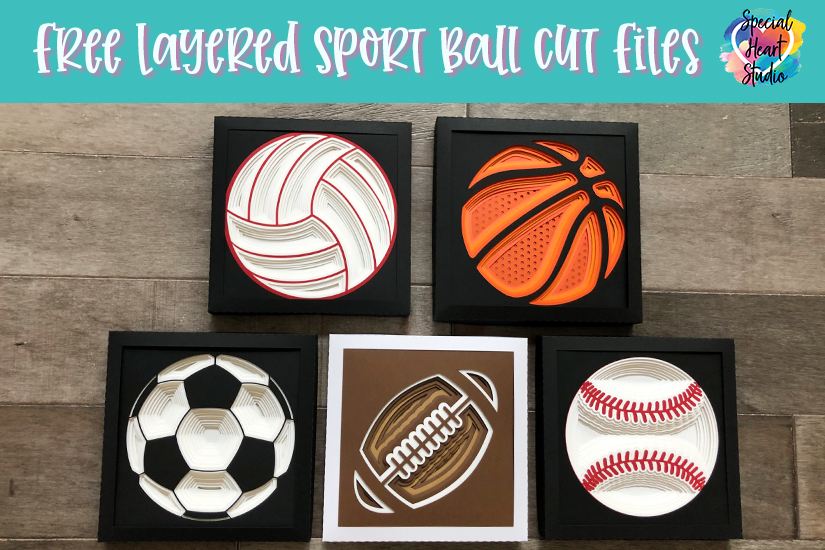
Baseball, Volleyball, Basketball, Soccer, and Football. Anyone else ready for sports to return? As I’m sitting here typing, MLB resumed yesterday, and my favorite baseball team will play their first “regular season” game of this strange summer. Go Astros!!!! 💙🧡💙🧡💙
These five designs are perfect for someone to try their first paper layering project. They cut smooth and quick and are easy to remove from that cutting mat.

LAYERED BASEBALL, BASKETBALL, FOOTBALL, SOCCER BALL AND VOLLEYBALL
These five designs are perfect for the sports lover in your life. Use them as room decor, or pair the balls with our Geometric Layered Alphabet for a custom shadow box. I can’t wait to see what everyone does with the layered balls.
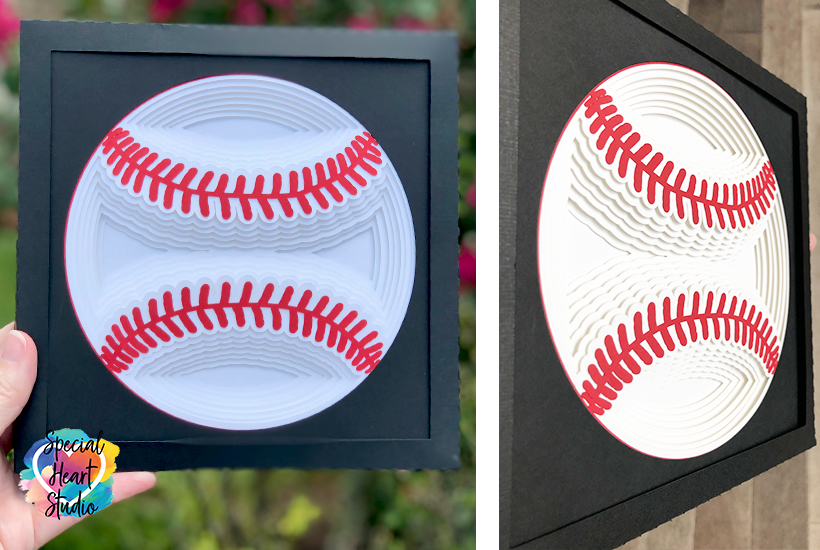
The Layered Baseball Cut File has 10 layers. In this example, I glued the first three layers and used Tombow foam tabs between the remaining layers.
MATERIALS TO MAKE 3D LAYERED BALLS
- 65 lb Cardstock – I use Recollections Brand Cardstock with my light grip Cricut mat on a light cardstock setting.
- Foam tabs – These foam tabs from Tombow are my absolute favorite. They’re thick enough to provide a good dimension to each project.
- Light grip mat (blue light grip)
- Cricut Maker – or your favorite cutting machine.
- Design #83 – Layered Sports Balls – Free SVG cut file (available in my freebie vault—get the password at the bottom of this post).
At the time of writing, I didn’t have an extra shadow box frame, so I made one using my own design. Download your cardstock shadow box (and a bonus layered mandala) here.
HOW TO MAKE YOUR OWN LAYERED SPORT BALL WITH CRICUT
Download the free design below. Once downloaded, unzip the download folder and select the file format for your machine. Cricut users will want to upload the SVG format. If you’re new to Cricut and need help with uploading, check out this how-to upload SVG post.
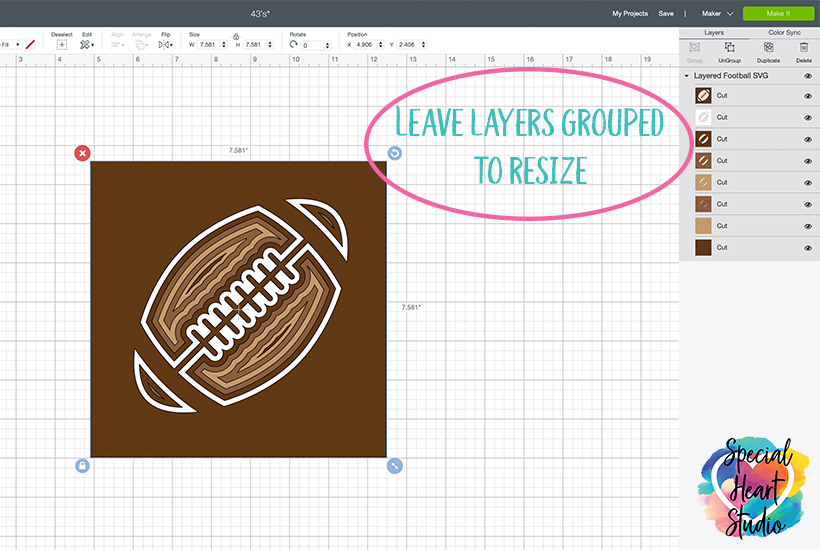
Determine the size you’d like to cut your project. Leave the layers grouped so that they all resize at the same time. You can drag the arrow in the bottom left corner or input exact measurement in the Size area of Design Space.
Once you have the correct size, click Make It!
I use Recollections brand cardstock from Michael’s. It’s a 65lb. weight and I’ve had great success cutting it on my Cricut Maker using a light grip mat (light blue) on the Light Cardstock setting.
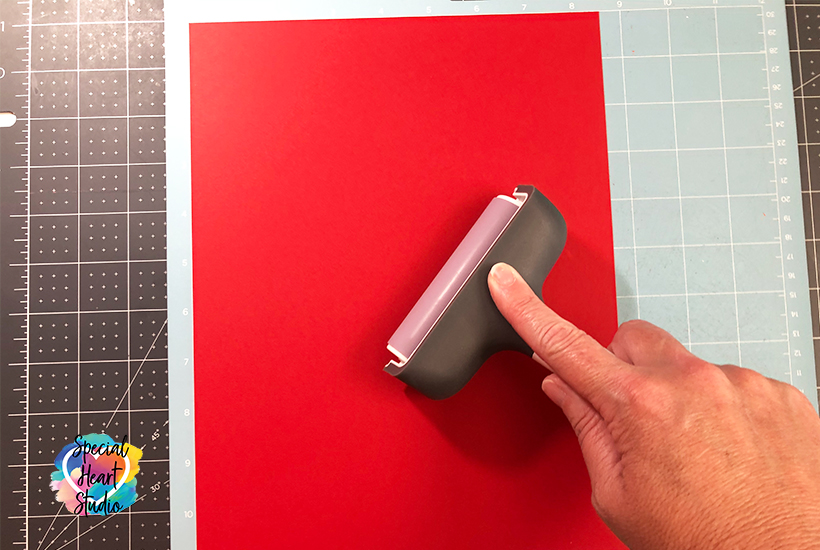
Using a brayer really helps adhere the cardstock to the mat. This will help reduce the paper slipping on the mat which can cause the paper to rip.
Once your layer has cut, it’s time to remove the paper from the mat.
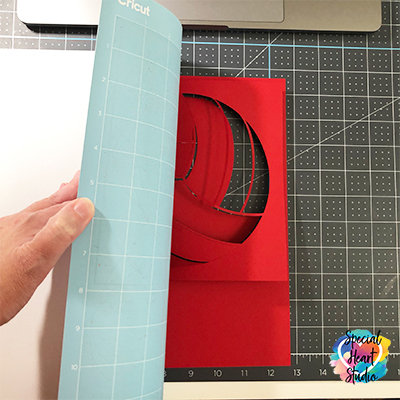
Instead of removing the paper from the cutting mat, it’s easier to remove the mat from the paper. Turn the cutting mat upside down on your work surface and gently bend the mat away from your material. I find it helps keep the paper (or vinyl) from curling or ripping.
Once all layers have cut, you’re ready to assemble the project. I love the Tombow Foam Tabs and randomly space them far enough apart so that the paper will not sag in the middle.
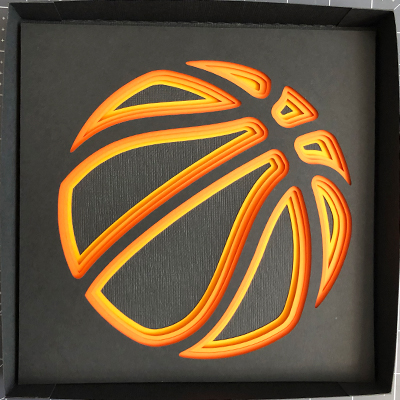
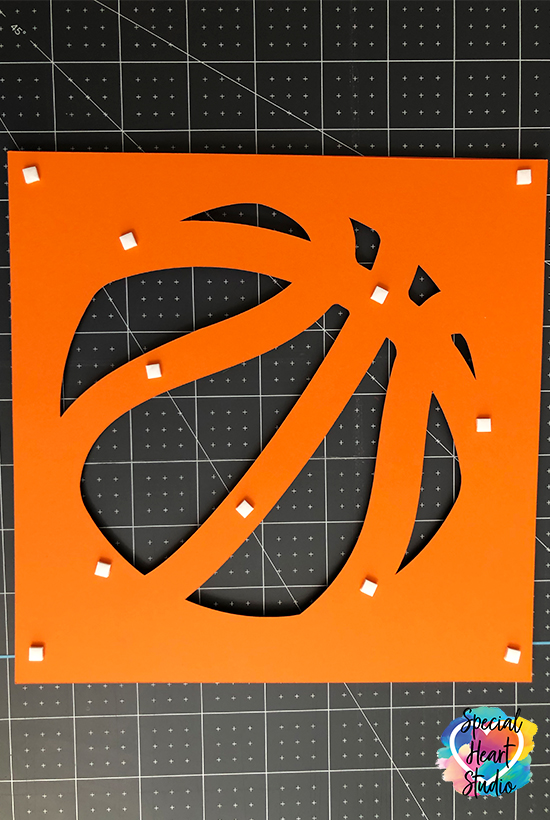
Continue to add the foam tabs between all layers. Feel free to customize the design to your taste. I found while assembling the Layered Basketball, that I thought it would look great with only half of the layers as shown above.

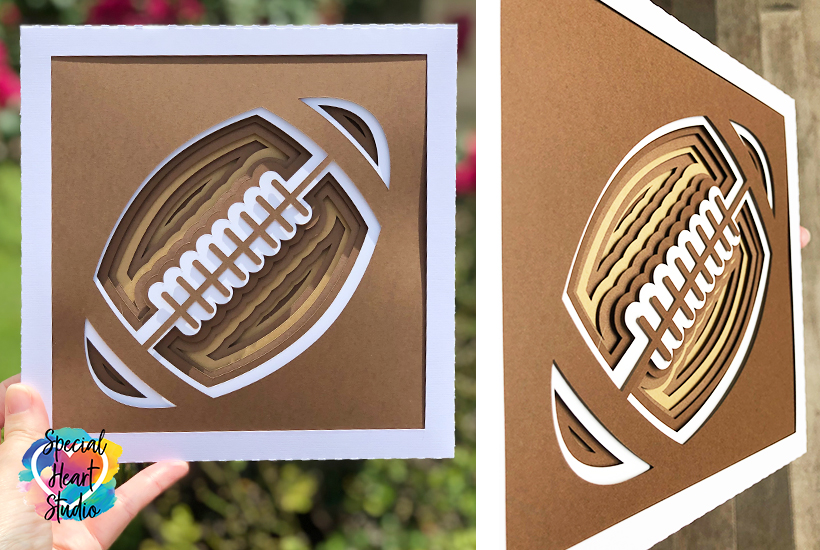
The Layered Basketball and Football designs have eight layers.
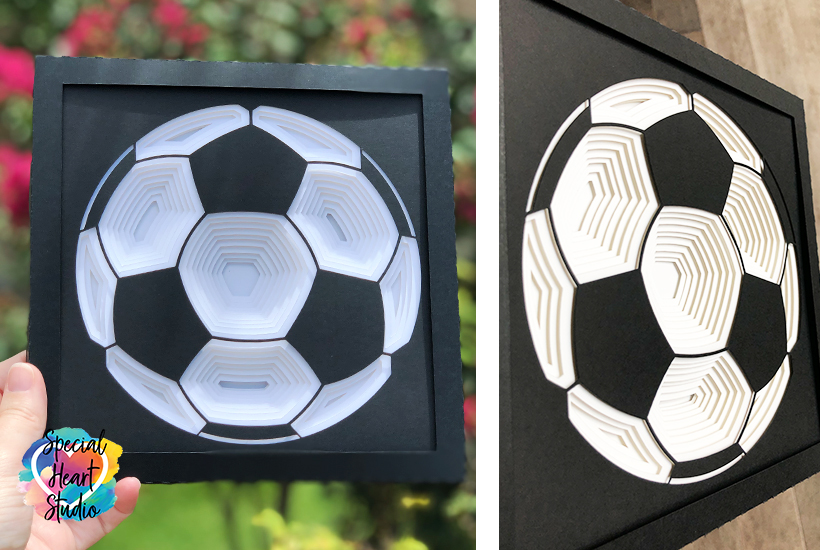
The Layered Soccer Ball is eleven layers.

Last, but not least, the Layered Volleyball design is nine layers.
For a more detailed video explanation, this video shows how I cut and assembled a layered mandala. The balls follow the same method of cutting and assembly.
I don’t mind if you use these designs for personal or small business commercial use up to 200 items, but please do not re-sell or re-distribute the files. I’d ask that you direct your crafty friends here to download the files themselves. Also, I don’t allow my designs to be used in print-on-demand shops or on transfers that will be sold. Click HERE for complete Terms of Service.
SHARE BEFORE DOWNLOADING
Please share! If you enjoy this project/design, please share it on your social media platform or your favorite Pinterest board. I greatly appreciate it!! That helps my blog continue to grow and enables me to continue to provide free designs. 💕 Thank you!


UPDATE: Tennis was a highly requested design after initially publishing the first 5 layered sports designs. To find the Layered Tennis Ball design, click here.
DOWNLOAD THE LAYERED SPORTS BALL SVG CUT FILES BY SUBSCRIBING (FREE) BELOW TO GET THE PASSWORD TO MY FREEBIE VAULT
New to Design Space and looking for help with how to upload? Click HERE to find directions to get started.
These will be great on school bulletin boards! Thank you for sharing. I love your layered designs.
I can not get this file to download 🙁
Hi, Would you mind letting me know what device you’re using? What browswer? Could you try a different browser. I need a bit more info to pinpoint the problem.
Thanks!
Gjoa
I used your wonderful file for a Birthday present for my son. It cut and assembled beautifully. I will try and post a picture on FB.
What size image would I cut on my Cricut of a soccer ball mandala 3D and baseball 3D to fit in a 9 x 9 shadow box?
I recommend measuring the inside of the shadow box frame as they can be different. Then decide the size from the measurements.
These are awesome! I would love a golf ball one!
Where can I find the paper with holes in it that you used for the basketball?
Hi Brenda,
The holes are actually part of my design. I used a reddish/brown piece of paper and the holes are part of the pattern. 🏀
Gjoa
I love your designs. Thanks so much. For the basketball did you buy certain recollections pack for the colors or just find different shades of orange, yellow and browns?
I just used various shades that I found in my paper stash. If my memory serves me correctly, many of them were in a pack of fall theme paper.
Hello,
I don’t see where to download the files. I must be missing it. Can you please help?
Thank you,
Audry G
Hi Audry,
All of my free downloads are kept in a library which I call my Freebie Vault. You can request a password and enter the vault on this page: https://specialheartstudio.com/get-a-password/
These are absolutely fantastic and I can’t wait to make some for my kids coaches. I was wondering if you would ever consider making an ball which resembles an Australian NRL ball? I can never find a ball like this in stamps or art work and all of my kids play footy 2x a year so it’s always something I struggle with.
Any help would be greatly appreciated!!
I cannot for the life of me get these layered projects. I download. Then unzip. All it ever shows is the finished project. One picture. No layers to cut out. I use a brand new iPad.
Hi Heidi,
If you’re viewing the SVG in a screen viewer it will just look like a photo. Once uploaded to software that can “read” the layers, such as Cricut Design Space or Silhouette Studio, you’ll be able to access the layers. Hope this helps.
Hello GJIA,
What size frame did you make these all in 8×8 or 9×9? I love them all and would love to make them.
For the ones pictured I made the frames from my shadow box frame design. I used the 7.5 size shadow box frame and sized each of the sport balls at 7.5 too.
It would be helpful if the layers were cut in order of each layered placement.
Yes, I agree. Unfortunately, design space tends to determine the order.